Weekly Design Tools for 2020 – Week No.5 Affinity Photo Image Optimization
What is image optimization?
Short answer, it’s reducing the file size of an image. When an image is in its full size and not optimized yet, it can have a file size of several MBs. Let’s use an image from Unsplash, for example. When you download an image for Unsplash, it will most likely be over 2 MBs. And that is far too large to add to your website. So we need to optimize it to make that file size shorter before adding it to your site.
In this article, we will go step by step in Affinity Photo, and I will show you a fast and easy way to do this. Once you learn the few steps it takes, you will be able to optimize an image in under a minute!
And if videos are more your thing you can see my step by step video at the end of this article.
Why do images need to be optimized for the web?
A website needs to load fast, or else you will lose visitors. Have you ever tried to visit a website and it takes forever to load. And what do you do when it gets stuck on loading? Get frustrated and forget about it!
One of the most common reasons for these slow load times is due to photos and images not being optimized. The way a website works is it needs to download everything in the browser first to show. And to give an idea of how big a website needs to be to load fast, a website should be under 1.5 MBs max. And keep in mind, half of that is the code that needs to load.
So if you have 1 image that is 6MBs, that one image has just made the website 4 times slower than it should be. And imagine five images that size! The good news is it’s super easy to optimize your images, and there are several tools to help you do this. In this article, we will be focusing on optimizing for the web in Affinity Photo.
How to optimize images for the web using Affinity Photo
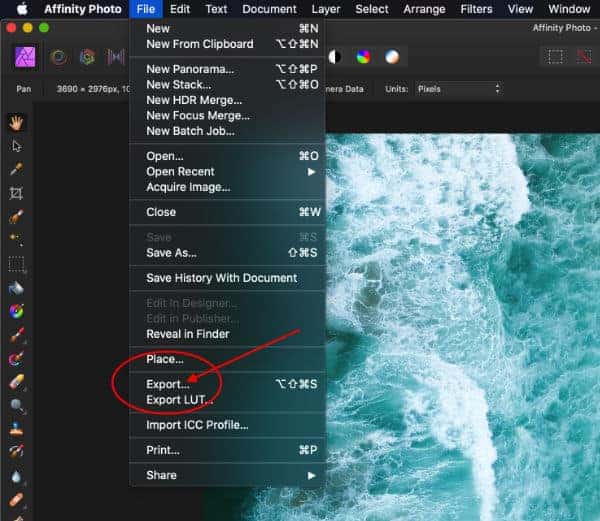
Step 1 – Opening up exporting options.
You can do this two ways. The first way, navigate to file in the top toolbar and select ‘Export.’ The second option is a keyboard shortcut. Press Shift + Option + Command + s at the same time. An export option box should pop up, looking like the image below.
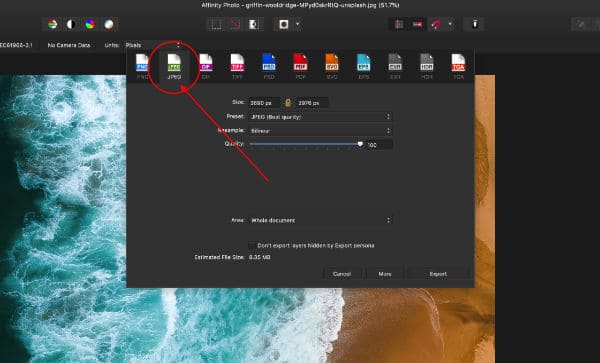
Step 2 – Selecting file format.
There are options for PNG, JPEG, GIF, TIFF, PSD, PDF, SVG, EPS, EXR, HDR, and TGA. Almost every time, you will be selecting JPEG for website images.
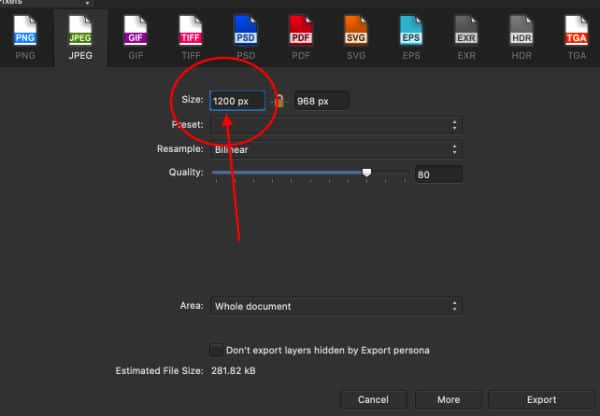
Step 3 – Resizing the image.
In the selections for size, the first number on the left is for width. And the second on the right is for height. In between the sizes is a lock icon. By keeping the lock closed, we will only need to change the width, and the height will adjust automatically. So keep the lock closed.
When I resize my images, I use the width to change. For large banner images, I resize to 1200px – 1400px. For images that are half the webpage and besides content, I resize from 600px – 800px. And for smaller images and thumbnails, I resize from 250px – 450 px.
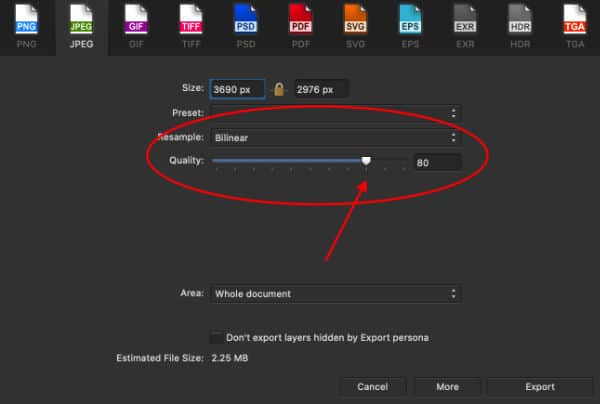
Step 4 – Adjusting the Quality
This is where the optimizations really take place. By adjusting the quality, we are actually compressing the image. By adjusting the quality from 100% to 80%, we can compress the image, make it smaller in size, and still keep the quality of the picture. Most times, the difference between 100% and 80% quality of an image will look just the same, but at a remarkably reduced file size.
On the bottom left of the export option box, you will see the ‘Estimated File Size.’ And you should notice a significant decrease in size.
Step 5 – Removing Meta Data
We are almost done! Just one more step. On the bottom of the export box, there is an option that says ‘More.’ Click on this, then select ‘Progressive.’ And uncheck ‘Embed ICC profile’ and ‘Embed metadata.’ This will remove the metadata attached to the image, which isn’t needed for the web and reduce the file size even more. After you’ve done this, press close.
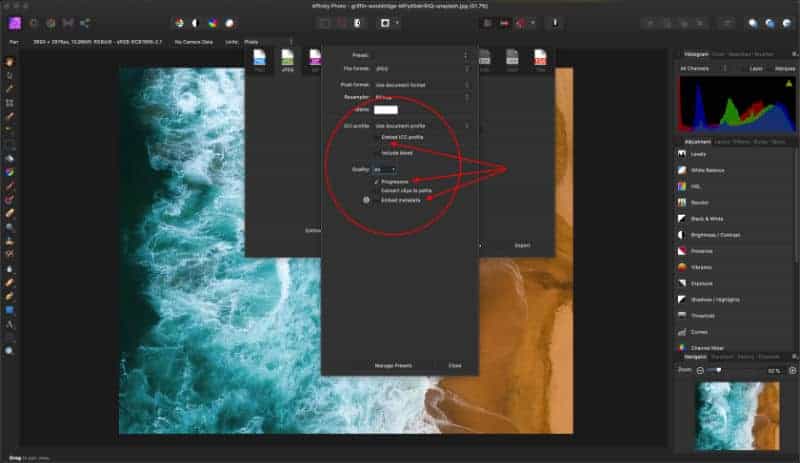
Now your image is fully optimized and ready to be added to your website. Just click ‘Export’ and save your image.
And if you have more than one image, your settings are going to stay the same! Just drag your images into Affinity, select export, resize your image, export, and save. The first time doing this might take a few minutes to get the hang of it. But once you are familiar with these steps, it takes very little time and effort to properly optimize your images.
I hope this article helps. I also created a walkthrough video to help show the process. If this helped you, please share, and if you have any suggestions, please drop them in the comments. Cheers!


2 Responses
Thanks! I needed this now!
I’m in affinity designer and selecting “progressive” increases the file size slightly. What does progressive do, and do we really need it?