
Technology has seen considerable advancements in just the last decade. Take, for example, a 10-year-old iPhone. It looks ancient and probably should be in a museum. A website from 10 years ago looks like it should be retired along with Internet Explorer.
Even the way we build websites has evolved. With tools like Elementor, Oxygen, and Webflow, would you use Dreamweaver and Flash to still build websites? (it’s a joke that mostly the older developers will get)
So why use the same hosting technology as was done ‘back in the days’?
Things have changed with website hosting and the technology used. Now we have cloud-based web hosting. You may have heard of some of the leading cloud hosts such as AWS, Google Cloud Platform, and Digital Ocean. These are not your ordinary shared servers stuffed with websites and managed on cPanel. Now we’re talking about the top-of-the-line and most advanced technology for web hosting in 2021.
From Shared Hosting to Virtual Private Cloud Host
When I first discovered cloud-based hosting, I have to admit, I was a bit skeptical. It was very different from what I was used to. To help give better context, I think it can help by sharing my journey using web hosting and how I ended up going all in one this new way of web hosting.
Evolving from Shared Servers
I started my web development journey 5 years ago and began using GoDaddy for web hosting. I was still a newb and had no idea how terrible GoDaddy is for hosting websites. Until I went to WP Engine. And OMG, such a massive difference in performance and usability.
But I was a new web developer and not charging that much yet, and WP Engine was a bit expensive for me. Still, I could not go back to shared hosting now that I saw how good dedicated hosting can be.
And then I found an excellent deal for Flywheel. And at this time, I was beginning to offer WordPress Maintenance Plans and hosting client’s websites. But the problem here was the cost. I would pay monthly for the freelancer package, which was 10 websites. And if only I have 5 to 6 client sites on my plans, I lost money for the other empty slots.
I also got Siteground for my clients on the lower-tier maintenance plans. Siteground was decent, and Elementor worked well there. For the 1st year, it is cost-effective, but after 1 year, the renewal price triples.
My WordPress Maintenance Plans were growing, and I signed on clients from different parts of the world. I needed individual servers for my clients in their locations. Doing that on Flywheel was very expensive, so I looked in Cloud-Based hosting, particularly Digital Ocean. And I was in over my head. It was very technical, and I saw it was going to be a lot of work to set up, optimize, and maintain. Sure, I can figure it out, but the time I would have to spend on just the hosting was more than I had available.
And then I found Cloudways. And it was completely different from all the hostings that I’ve used, which is why I wanted to make this article. I’ll take you on a walk-through and show you how to get started, set up your first WordPress website.
What is Cloudways?
Setting up a server on AWS or a droplet (a server) on Digital Ocean can be very technical and has a bit of a learning curve. They also require optimization for the correct development environment and ongoing management.
And even for myself, a front-end developer, I felt it was more than I wanted to deal with.
What Cloudways does is set up the servers, optimize them, and then manage them. They take care of all the technical areas so we, the users, can deploy a server and a WordPress website with just a click of a button.
They also have built an intuitive backend server management and eco-system that is easy to use with clean and modern UI. They have the other essential add-ones a good hosting would have. Such as domain emails, SMTP, SSL, domain management, and CDN, all connected in one area.
How to Get Started with Cloudways: The easy way
Getting started is simple. From sign up to actually being able to create a WordPress website takes less than 20 minutes.
The first step is to create an account. After your account is created, you’ll start with a screen that looks like this:
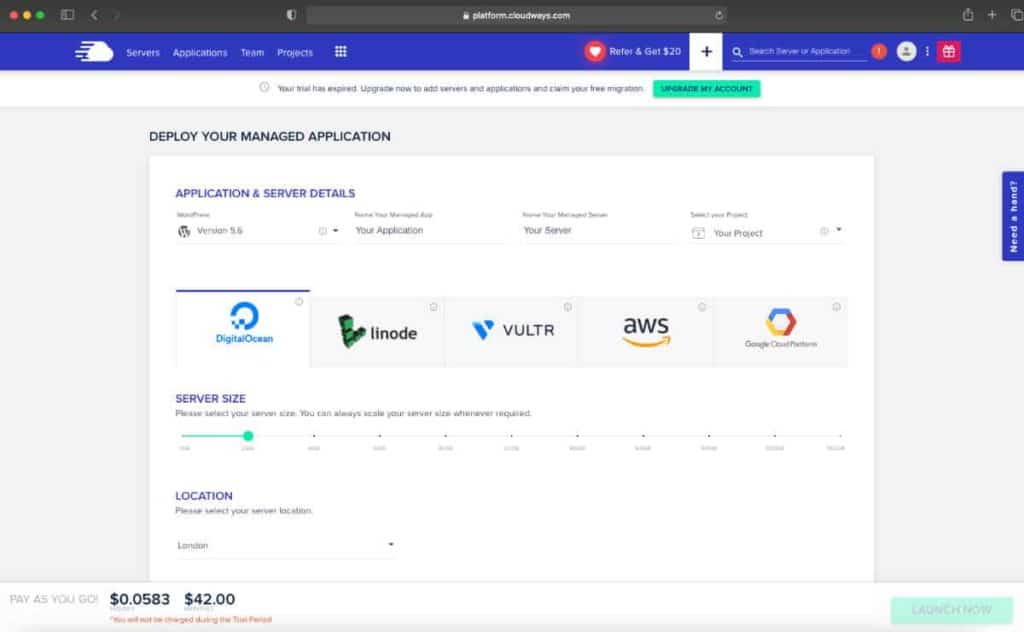
Here is where you choose the server you’d like to use. You have five choices. Digital Ocean, Linode, Vultur, AWS, and Google Cloud Platform.
The first three, DO, Linode, and Vultur, are all very similar regarding pricing and performance. Either of these is excellent for a majority of websites, including e-commerce.
The big dogs are AWS and Google Cloud. These are for enterprise-level websites and anything that requires heavy resources. They are also more expensive. I would suggest these two only for a website that needs this type of power, has very high traffic, and many functionalities.
Once you choose your server, the next step is to select your server size. Here’s where things get interesting. One of the significant benefits of cloud-based hosting is the ability to scale up. Meaning, you can select the smallest server size. If your site grows and demanded more resources, later, you can scale your server up to a larger size with just a click of a button. I would suggest starting off small to save costs and scale-up only when needed.
Cloudways Pricing: Is it worth it?
And here’s where my initial skepticism kicked in. The pricing is very different from what I was used to. You’ll see a monthly fee and then an hourly fee. And a pay-as-you-go model.
First, I never have paid more than what the monthly fee showed. In fact, sometimes I spent a little bit less. The way the hourly fee works, let’s say I create a server and use it for only 2 days and then delete the server. I will only be billed for the 2 days, which is less than a dollar.
This pricing model is the solution for those of us managing several sites in different locations. Because now, I only pay for what I use!
How to Set Up a WordPress Website on Cloudways
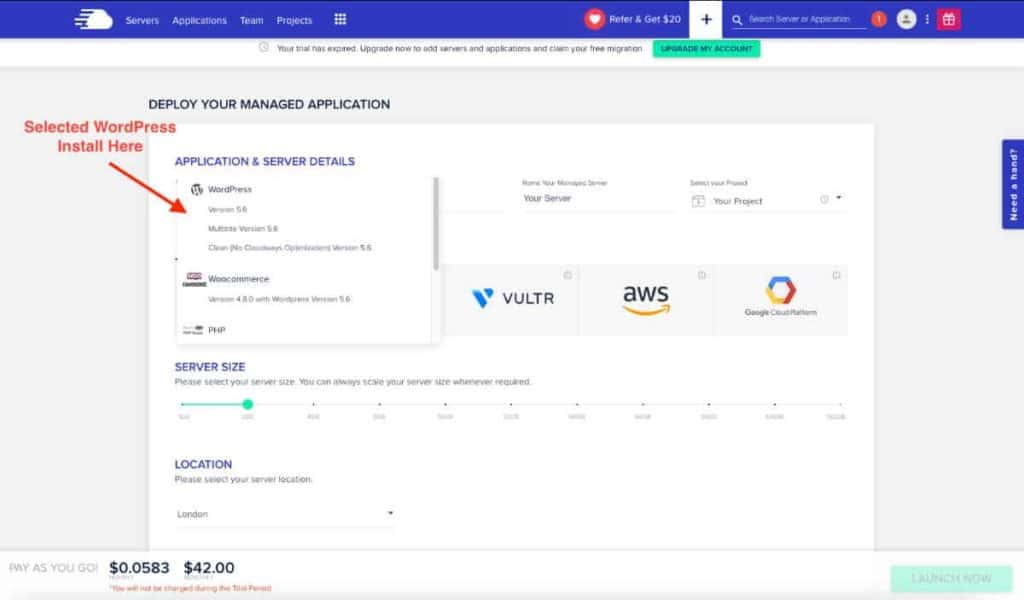
After you have chosen your server and server size, the next step is to select your application. In Cloudways, application means website. So anytime you see the word application, just replace it with ‘website.’
In the top dropdown ‘Select your application,’ you have a few options.
- 1. WordPress (latest version): This is a basic WordPress install that comes with a Cloudways optimization plugin included.
- 2. Multisite (latest version): Basic WordPress Multisite install
- 3. Clean (no Cloudwasy optimizations latest version): This is a clean bare-bones WordPress install and the one I always choose. I prefer to add my optimizations after a site is completed.
- 4. WooCommerce: WordPress install with WooCommerce
- 5. PHP: This is for custom-built websites using a PHP framework. There is no WordPress here.
You will need to give your ‘Managed App’ a name. This is the name of your website. Then give your ‘Managed Server’ a name. And later, you can add a Project. The Projects come in handy when you start hosting several websites with organizing them.
Now you’re ready to launch! Click the Launch button on the bottom right corner, and Cloudways does its magic. It takes about 5-10 minutes for your server to get set up and ready to go.
How to Start WordPress on Cloudways
Once your server is ready, you will start on your application’s ‘Access Details.’ There is a temporary URL to help get started, so you can start building your website right away.
When you are ready to connect your domain to your Cloudways server, navigate to Domain Management in your Application. Add your domain here. You will need to add your server’s IP address that can be found in the ‘Access Deatails’ to your DNS setting. This is going to be where your domain is located. In your DNS settings (this is not in Cloudways but in where your domain is located), add your Cloudways server IP address to the A record. In most cases, that is enough to connect your site to your server.
Once your site is connected, navigate to SSL Certificate in your application settings, and add your SSL.
Here is a walkthrough video to better help guide your through this process:
Is Cloudways Good For Elementor?
Most sites I build are with Elementor. One thing I learned about Elementor is that having the right hosting makes a huge difference. The front-end editor is heavy and needs the right power. On the wrong server, it can go so slow and struggle to make changes.
But on the correct server, it’s as smooth as melted butter. Usually, I would use localhost to develop an EL site. Still, with Cloudwasy, it is so fast that I don’t even bother with local hosts anymore. It is by far the fastest experience I have had with Elementor development.
